Showing posts with label frozen desserts. Show all posts
Showing posts with label frozen desserts. Show all posts
Tuesday, January 11, 2011
Dark Chocolate Orange Ice Cream
I love chocolates. I have always loved chocolates. (The many cavities in my teeth and the dentist bills I have raked up over the years will bear testimony to that love!)
Initially, it was milk chocolates and chocolates with assorted nuts and dry fruits. Much later, I discovered dark chocolates and liqueur centred chocolates and my love for chocolates only intensified.
Ironically, much as I love chocolates, I don't much care for chocolate ice cream. In fact, it has been ages since I ate chocolate ice cream.

The cake didn't happen that evening but I managed to fall in love with chocolates in ice creams after a long, long time!
Ingredients:
In a small saucepan, heat the cream till it starts to bubble around the edges. Pour it over the chocolate chips and mix till the chocolate chips are melted.
In another saucepan, combine 2 cups of milk with the orange zest. Heat until the milk just starts to steam. Turn the heat off, cover and let it steep for about 10 minutes. Then remove the zest from the milk and re-heat till the milk starts to simmer.
Add the cream-chocolate chips mixture and the orange essence to this custard and stir till properly combined.
Cool on the counter top to room temperature, add in the vodka, if using, and then chill in the refrigerator for atleast 5-6 hours, preferably overnight and then freeze according to the directions of your ice cream machine.

Initially, it was milk chocolates and chocolates with assorted nuts and dry fruits. Much later, I discovered dark chocolates and liqueur centred chocolates and my love for chocolates only intensified.
Ironically, much as I love chocolates, I don't much care for chocolate ice cream. In fact, it has been ages since I ate chocolate ice cream.

A couple of days ago, I happened to zest some oranges for making this Chocolate Orange Bundt Cake, when all of a sudden, I had this intense desire to have the chocolate orange combo in an ice cream.
The cake didn't happen that evening but I managed to fall in love with chocolates in ice creams after a long, long time!
Dark Chocolate Orange Ice Cream
(adapted from Desi Soccer Mom and The Italian Chef)
Ingredients:
Low fat milk: 3 cups
Sugar: 3/4 cup* (you could do a taste test and add more, 3/4 cup works perfectly for us)
Cornflour: 2 tbsps
Cocoa: 3 tbsps
Bittersweet chocolate chips**: 2/3 cup
Low fat cream: 1/2 cup
Zest of 1.5 oranges
Orange essence: 1/4 tsp
Vodka: 1 tbsp, optional
(**if using semi-sweet chocolate chips, reduce the sugar to 2/3 cup)
Method:
In a cup of milk, whisk together the sugar, cocoa powder and the cornstarch till the mixture is lump-free and smooth. (I simply put everything into a liquidiser - saves a lot of effort in mixing!)
In a small saucepan, heat the cream till it starts to bubble around the edges. Pour it over the chocolate chips and mix till the chocolate chips are melted.
In another saucepan, combine 2 cups of milk with the orange zest. Heat until the milk just starts to steam. Turn the heat off, cover and let it steep for about 10 minutes. Then remove the zest from the milk and re-heat till the milk starts to simmer.
Pour the cocoa mixture into the simmering milk in a thin stream, stirring constantly. Continue to stir and cook the mixture on a low heat until it comes to a rolling boil and starts to thicken. Turn off the gas and remove the saucepan from the burner.
Add the cream-chocolate chips mixture and the orange essence to this custard and stir till properly combined.
Cool on the counter top to room temperature, add in the vodka, if using, and then chill in the refrigerator for atleast 5-6 hours, preferably overnight and then freeze according to the directions of your ice cream machine.

Mmm....mmmm....mmmmmm.....if you love the chocolate orange combo, then this is a flavour you must absolutely must try. The dark chocolate gives it a very intense chocolatey taste followed by a very delicate flavour of orange.
However, if you'd rather not mix chocolates and oranges, just skip the orange zest and the essence from the recipe. The resulting dark chocolate ice cream will satiate every chocoholic!
This delicious melting treat is off to Julia who is hosting In the Bag - December.

Friday, May 21, 2010
And the answer is....
A few days ago, my daughter came back from the playground, all sweaty and red-faced and headed straight to the fridge. She was thirsty and glugged down some juice directly from the carton. Seeing her do that sent me down memory lane to my childhood....
No matter that it is almost 20 years(!) since I last attended school, no matter that my daughter's school follows a completely different calendar, to my mind, the months of April and May will forever be associated with school holidays.
Two months spent with nary a care in the world, gallivanting barefoot in the scorching sun, playing chor-police or lagori or dodge ball or simply riding the bicycle aimlessly around the neighbourhood.
By noon, sweaty, tired and thirsty from spending long hours in the hot sun, we'd run home, open the fridge and glug down whatever juice or sherbet my mother would have made. Sometimes, it would be kokum sherbet, sometimes, nimbu pani; April and May being the mango season, most of the times, there would be kairi panha sitting in the fridge. Cold, tangy and sweet with a hint of cardamom, it was manna from heaven, the best thirst quencher ever.
Raw mangoes: 2 large
Jaggery: 1 cup (you might need to add more or less depending on how sour your mangoes are)
Water: 1 cup
Cardamom powder: 3/4 tsp (essential)
Salt: a pinch
Method:
Pressure cook the mangoes till they are cooked through - about 2 whistles should do it.
When they are cool enough to handle, scoop out the flesh and set aside. You need 1 cup of mango pulp; I needed 1 large mango for that amount.
Meanwhile, in a saucepan, combine the jaggery and water and simmer for 5 minutes. Strain and cool.
Blend together the mango pulp and the jaggery-water mixture till smooth and creamy (taste at this stage, you might need to add more jaggery if your mangoes are too sour). Add in the cardamom powder and a pinch of salt. Chill for about 3 hours and then freeze in your ice- cream maker according to the manufacturer's instructions.
This sorbet is best eaten when it has just set; else leave it on the counter for about 5 minutes before serving.
What can I say about the taste? Suffice to say that when I had the first spoonful, I did a little dance in the kitchen. If tangy and sweet is to your taste, then make this sorbet while green mangoes are still in season. I pigged out on the sorbet and ended up with a severe cold for the last 10 days that led to a sore throat and a ear infection.
Now that I have recovered, I have another batch being churned in the ice cream maker even as I write this post!
Sharing this Green Mango Sorbet with 'I Scream For Ice Cream' Challenge hosted by Yasmeen.
No matter that it is almost 20 years(!) since I last attended school, no matter that my daughter's school follows a completely different calendar, to my mind, the months of April and May will forever be associated with school holidays.
Two months spent with nary a care in the world, gallivanting barefoot in the scorching sun, playing chor-police or lagori or dodge ball or simply riding the bicycle aimlessly around the neighbourhood.
By noon, sweaty, tired and thirsty from spending long hours in the hot sun, we'd run home, open the fridge and glug down whatever juice or sherbet my mother would have made. Sometimes, it would be kokum sherbet, sometimes, nimbu pani; April and May being the mango season, most of the times, there would be kairi panha sitting in the fridge. Cold, tangy and sweet with a hint of cardamom, it was manna from heaven, the best thirst quencher ever.

I haven't had kairi panha in many years now, to be frank, I haven't even missed it too much.
However, that day, after my little trip down memory lane, I just had to have it. I literally flew out of the house and to the Indian grocery shop to buy some raw mangoes.

Green (raw) mango sorbet wasn't something that I had even heard of. Yet, as I churned the raw mango pulp to make the panha, I noticed that it was incredibly smooth and creamy. A little germ of an idea began to take shape....how about a green mango sorbet.......
And so, with the next batch of mangoes, I made a sorbet. Yes Dipali, you were absolutely right! Raw mangoes is what went into this sorbet.
Ingredients:
Raw mangoes: 2 large
Jaggery: 1 cup (you might need to add more or less depending on how sour your mangoes are)
Water: 1 cup
Cardamom powder: 3/4 tsp (essential)
Salt: a pinch
Method:
Pressure cook the mangoes till they are cooked through - about 2 whistles should do it.
When they are cool enough to handle, scoop out the flesh and set aside. You need 1 cup of mango pulp; I needed 1 large mango for that amount.
Meanwhile, in a saucepan, combine the jaggery and water and simmer for 5 minutes. Strain and cool.
Blend together the mango pulp and the jaggery-water mixture till smooth and creamy (taste at this stage, you might need to add more jaggery if your mangoes are too sour). Add in the cardamom powder and a pinch of salt. Chill for about 3 hours and then freeze in your ice- cream maker according to the manufacturer's instructions.
This sorbet is best eaten when it has just set; else leave it on the counter for about 5 minutes before serving.
What can I say about the taste? Suffice to say that when I had the first spoonful, I did a little dance in the kitchen. If tangy and sweet is to your taste, then make this sorbet while green mangoes are still in season. I pigged out on the sorbet and ended up with a severe cold for the last 10 days that led to a sore throat and a ear infection.
Now that I have recovered, I have another batch being churned in the ice cream maker even as I write this post!
Sharing this Green Mango Sorbet with 'I Scream For Ice Cream' Challenge hosted by Yasmeen.
Thursday, March 25, 2010
Chikoo (sapodilla) and Date Frozen Yogurt
Now I am the kind of person who likes to have something sweet post dinner. Rather, I need to eat something sweet every night. Since eating dessert is more a need rather than an occasional indulgence, I do end up counting calories, especially the calories from refined sugar.
However, this chikoo and date frozen yogurt is something I eat without counting any calories. For one, it uses low fat yogurt, but more importantly, since chikoos and the dates are naturally very sweet, this frozen yogurt doesn't need ANY refined sugar.
So, if you, like me, need to have something sweet after dinner, this frozen yogurt is something you must try - good to taste and nothing on the waist!

Ingredients:
Chikoos: 3-4 nos
Dates: 20- 25 nos
Yogurt: 500 ml
Low Fat sour cream: 1/4 cup
Honey: 3 tbps, optional
Lemon juice: 1 tbsp
Vanilla essence: 1 tsp
Salt: a pinch
Method:
Soak the dates in water for about 4-5 hrs. Once soft, drain the water, remove the seeds and the flaky outer skin as well. Grind to a smooth pulp, using a little milk, if needed. You need about 1/2 a cup of the date puree.
Peel the chikoos, discard the seeds and grind to a smooth pulp. You need 3/4 cup of the chikoo puree.
Hang the yogurt in a clean muslin cloth for about 4-5 hrs, so that the water (whey) drains off. Transfer it to a bowl, add the sour cream and using a hand blender/wooden spoon, beat till smooth and fluffy.
Add the date and the chikoo puree, honey, lemon juice and essence and beat a couple of minutes more. Chill the mixture for a couple of hours and then freeze in your ice cream maker according to the manufacturer's instructions.
If you don't have an ice cream maker, then there is some work involved: freeze the mixture in a closed box and every time it starts to set along the edges, blend it in the mixie - do this at least 3 times.
This frozen yogurt is high in the total fruit pulp content and is low fat and therefore is best eaten as soon as it sets. Else, let it sit on the counter for about 5 minutes before scooping it out.
However, this chikoo and date frozen yogurt is something I eat without counting any calories. For one, it uses low fat yogurt, but more importantly, since chikoos and the dates are naturally very sweet, this frozen yogurt doesn't need ANY refined sugar.
So, if you, like me, need to have something sweet after dinner, this frozen yogurt is something you must try - good to taste and nothing on the waist!

Ingredients:
Chikoos: 3-4 nos
Dates: 20- 25 nos
Yogurt: 500 ml
Low Fat sour cream: 1/4 cup
Honey: 3 tbps, optional
Lemon juice: 1 tbsp
Vanilla essence: 1 tsp
Salt: a pinch
Method:
Soak the dates in water for about 4-5 hrs. Once soft, drain the water, remove the seeds and the flaky outer skin as well. Grind to a smooth pulp, using a little milk, if needed. You need about 1/2 a cup of the date puree.
Peel the chikoos, discard the seeds and grind to a smooth pulp. You need 3/4 cup of the chikoo puree.
Hang the yogurt in a clean muslin cloth for about 4-5 hrs, so that the water (whey) drains off. Transfer it to a bowl, add the sour cream and using a hand blender/wooden spoon, beat till smooth and fluffy.
Add the date and the chikoo puree, honey, lemon juice and essence and beat a couple of minutes more. Chill the mixture for a couple of hours and then freeze in your ice cream maker according to the manufacturer's instructions.
If you don't have an ice cream maker, then there is some work involved: freeze the mixture in a closed box and every time it starts to set along the edges, blend it in the mixie - do this at least 3 times.
This frozen yogurt is high in the total fruit pulp content and is low fat and therefore is best eaten as soon as it sets. Else, let it sit on the counter for about 5 minutes before scooping it out.
Wednesday, August 5, 2009
Banana Choco Nut Ice Cream
So many bloggers seem to be going, er, bananas over the last couple of days....I am sure you have all noticed banana muffins and breads and halwas that have been going around in the blogosphere recently.
I couldn't resist going their way...going bananas, that is.
So here's a delicious Banana Choco Nut Ice Cream....packed with the goodness of bananas, nuts and low fat milk, this is a (healthy) treat that, to me, is irrestible!

Variations:
Instead of blending the bananas in the mixie, mash it up with your hand if you like a chunky ice cream.
For a chocolate chip effect, chill the base custard in the fridge. Melt the chocolate and add it to the chilled custard.
(If you are not using an ice cream maker, add in the above two variations after the last cycle of blending).
Notes:
* if the bananas are very sweet (mine were), add the lemon juice. If they happen to be a little sour, add another 10 gms of sugar and omit the lemon juice.
And don't go by my picture of a melting ice cream - that scoop endured different poses and angles for a not so perfect picture - in fact you'll need to let the ice cream rest for about 5 minutes at room temperature before serving.
Indulge!!
I couldn't resist going their way...going bananas, that is.
So here's a delicious Banana Choco Nut Ice Cream....packed with the goodness of bananas, nuts and low fat milk, this is a (healthy) treat that, to me, is irrestible!

Ingredients:
Low Fat Milk - 250 ml + 50 ml
Skimmed Milk Powder - 4 tbsps
Sugar *- 30
Cornflour - 3/4 tsp
Cocoa powder - 1 tsp
Milk/Dark Chocolate - 30 gms
Walnuts/ Almonds(peeled) - 3 tbsps, chopped (I used equal amounts of both, but I prefer using walnuts)
Banana (peeled) - 150 gms
Lemon juice* - 5 drops
Method:
Mix together skimmed milk powder, cornflour, cocoa powder, sugar with the 50 ml milk.
Boil the remaining milk and add the above mix to it in a thin stream, stirring constantly as you pour it in. Keep stirring till it comes to a boil. Lower the flame and let it simmer for a further 2-3 minutes.
Switch off the gas and add the chocolate to it; stir to melt it.
When the mixture cools, blend together in a mixie along with the bananas.
Add the chopped nuts and freeze according to your ice cream maker's instructions.
If you don't have an ice cream maker, then you will need to blend the ice cream in the mixie to a thick slush, about 4 times - do this when the ice cream is in the semi-set stage. In that case, add the nuts after you are done with the last cycle of blending.
Variations:
Instead of blending the bananas in the mixie, mash it up with your hand if you like a chunky ice cream.
For a chocolate chip effect, chill the base custard in the fridge. Melt the chocolate and add it to the chilled custard.
(If you are not using an ice cream maker, add in the above two variations after the last cycle of blending).
Notes:
* if the bananas are very sweet (mine were), add the lemon juice. If they happen to be a little sour, add another 10 gms of sugar and omit the lemon juice.
And don't go by my picture of a melting ice cream - that scoop endured different poses and angles for a not so perfect picture - in fact you'll need to let the ice cream rest for about 5 minutes at room temperature before serving.
Indulge!!
Monday, June 22, 2009
Eggless, Low Fat Mango Ice Cream
Patience is not a virtue that I have in abundance, and ice cream making really tests my patience. I mean, imagine making the ice cream and then blending it again and again and again and again and again and again - see, aren't you already running out of patience reading 'again and again' - before being able to completely freeze it and eat it! That takes real patience and restraint and so more often than not, I'd end up with store bought ice creams.
But there is nothing like home made ice cream and so finally, last month, I trooped down to an electronics store and bought an ice cream maker.
Ice cream making is such a breeze now - wonder why I waited so long to buy one!!

I was complaining about this to my mum and she mailed me this recipe - this is a recipe that she had in her old recipe book - and boy! what a lovely, creamy ice cream it results in.
I have made numerous flavours - chocolate, lychee, vanilla (you have been warned - I will be posting ice creams very often now!)- but when it is the season for mangoes, how can I not make mango ice cream?

Eggless Low Fat Mango Ice Cream
But there is nothing like home made ice cream and so finally, last month, I trooped down to an electronics store and bought an ice cream maker.
Ice cream making is such a breeze now - wonder why I waited so long to buy one!!

Most of the ice cream recipes that came along with the ice cream maker or the ones I found on the net used either egg yolk or cream. Considering we have a major sweet tooth and indulge in ice creams very often, I wanted an ice cream that used neither egg yolks or cream - a slightly healthier version.
I was complaining about this to my mum and she mailed me this recipe - this is a recipe that she had in her old recipe book - and boy! what a lovely, creamy ice cream it results in.
I have made numerous flavours - chocolate, lychee, vanilla (you have been warned - I will be posting ice creams very often now!)- but when it is the season for mangoes, how can I not make mango ice cream?

Eggless Low Fat Mango Ice Cream
Ingredients
Low Fat Milk - 400 ml + 50 ml
Unsweetened Skimmed Milk Powder - 40 gms ( I used Saagar Milk Powder)
Sugar - 40 gms (use more or les depending on the sweetness of the mango)
Cornflour - 1 tsp
Mango pulp - 400 ml
Method:
Mix together milk powder, sugar and cornflour with 50 ml milk to make a smooth paste without any lumps; this is takes a lot of patience so I whiz mine in the mixie.
Boil the remaining milk, then add the paste slowly stirring continuously and bring it to a boil. Simmer for 2 mins. Let it cool - I cool this in an ice water bath.
Once it cools, add the mango pulp and blend it in the mixie.
Freeze according to your ice cream maker's instructions. Tada....enjoy the delicious and creamy mango ice cream!!
(If you don't have an ice cream maker, then blend the ice cream 4-6 times everytime it reaches a semi -soft stage to break the crystals).
Low Fat Milk - 400 ml + 50 ml
Unsweetened Skimmed Milk Powder - 40 gms ( I used Saagar Milk Powder)
Sugar - 40 gms (use more or les depending on the sweetness of the mango)
Cornflour - 1 tsp
Mango pulp - 400 ml
Method:
Mix together milk powder, sugar and cornflour with 50 ml milk to make a smooth paste without any lumps; this is takes a lot of patience so I whiz mine in the mixie.
Boil the remaining milk, then add the paste slowly stirring continuously and bring it to a boil. Simmer for 2 mins. Let it cool - I cool this in an ice water bath.
Once it cools, add the mango pulp and blend it in the mixie.
Freeze according to your ice cream maker's instructions. Tada....enjoy the delicious and creamy mango ice cream!!
(If you don't have an ice cream maker, then blend the ice cream 4-6 times everytime it reaches a semi -soft stage to break the crystals).
Monday, April 13, 2009
Strawberry Swirl Frozen Yogurt
Don't children say the most adorable things sometimes?
Most days, when I click pictures for the blog, my daughter will (touchwood) leave me alone. Like everyone else, I think she is bemused at the entire process of taking food pictures - bending at varying angles, moving the food from one room to the other, transferring it to numerous bowls - you all know the drill better than me, I am sure. But very often, a food photo session turns into a photo session with her!
I took these pictures on Sunday afternoon and for once, she would scarcely let me take the pictures. She wanted to take the pictures herself, or strike some pose for the camera, and though she does not care too much for "pink" ice cream, she still wanted to dig in!
Inspite of the air conditioner running at full blast, the frozen yogurt was fast melting. And so, I pleaded with her to bear with me. "Mama is not getting a good picture", I explained.
"Say cheese, pink ice cream. Say cheeeeese!" she quipped in response.

Strawberry Swirl Frozen Yogurt
Ingredients:
Low Fat Yogurt - 2 lts
Low Fat Sour Cream - 250 ml
Low Fat Fresh Cream - 100 ml
Strawberry puree - 2 1/2 cups
Sugar - 3/4 cup (more or less, depending on the tartness of the berries)
Juice of half a lime
Salt - a pinch
Gelatin - 1 1/2 tsp
Water - 3 tbsp
Method:
Strain the whey from the yogurt by hanging it in a muslin cloth. At the end of 6 hours (when I ran out of patience), I had 720 gms of strained yogurt.
Puree the strawberries (unfortunately, I didnt measure the berries in gms). Strain the puree, if desired - I didn't. Add the lime juice and sugar to the puree, cook to a simmer and then cool for about an hour.
Beat the hung yogurt, sour cream and fresh cream together till you get soft peaks.
Mix the water and gelatin together and let it stand for about 5 minutes; then, melt the gelatin by stirring it over a bowl of hot water. Cool it to room temperature.
Reserve 1/4 cup of the strawberry sauce and add the rest to the yogurt. Slowly, stir in the gelatin, add a pinch of salt and blend everything together thoroughly.
Freeze.....
Lucky you if you have an ice cream maker - just follow the manufacturer's instructions.
If you don't, there's some work involved - every time the yogurt is nearly set, whiz it in the mixie. And mash it with the back of a spoon every two hours.
I know how difficult it is to not just sit and eat it up - I had Terradaze ask me so many times if we could (at last) eat it! However, I wanted the consistency to be just right - soft and creamy- and so, I processed it 6 times before I was happy with the consistency.
Have you made you favourite FROZEN DESSERT yet? Yes? Send it over soon :)
Most days, when I click pictures for the blog, my daughter will (touchwood) leave me alone. Like everyone else, I think she is bemused at the entire process of taking food pictures - bending at varying angles, moving the food from one room to the other, transferring it to numerous bowls - you all know the drill better than me, I am sure. But very often, a food photo session turns into a photo session with her!
I took these pictures on Sunday afternoon and for once, she would scarcely let me take the pictures. She wanted to take the pictures herself, or strike some pose for the camera, and though she does not care too much for "pink" ice cream, she still wanted to dig in!
Inspite of the air conditioner running at full blast, the frozen yogurt was fast melting. And so, I pleaded with her to bear with me. "Mama is not getting a good picture", I explained.
"Say cheese, pink ice cream. Say cheeeeese!" she quipped in response.

Strawberry Swirl Frozen Yogurt
Ingredients:
Low Fat Yogurt - 2 lts
Low Fat Sour Cream - 250 ml
Low Fat Fresh Cream - 100 ml
Strawberry puree - 2 1/2 cups
Sugar - 3/4 cup (more or less, depending on the tartness of the berries)
Juice of half a lime
Salt - a pinch
Gelatin - 1 1/2 tsp
Water - 3 tbsp
Method:
Strain the whey from the yogurt by hanging it in a muslin cloth. At the end of 6 hours (when I ran out of patience), I had 720 gms of strained yogurt.
Puree the strawberries (unfortunately, I didnt measure the berries in gms). Strain the puree, if desired - I didn't. Add the lime juice and sugar to the puree, cook to a simmer and then cool for about an hour.
Beat the hung yogurt, sour cream and fresh cream together till you get soft peaks.
Mix the water and gelatin together and let it stand for about 5 minutes; then, melt the gelatin by stirring it over a bowl of hot water. Cool it to room temperature.
Reserve 1/4 cup of the strawberry sauce and add the rest to the yogurt. Slowly, stir in the gelatin, add a pinch of salt and blend everything together thoroughly.
Freeze.....
Lucky you if you have an ice cream maker - just follow the manufacturer's instructions.
If you don't, there's some work involved - every time the yogurt is nearly set, whiz it in the mixie. And mash it with the back of a spoon every two hours.
I know how difficult it is to not just sit and eat it up - I had Terradaze ask me so many times if we could (at last) eat it! However, I wanted the consistency to be just right - soft and creamy- and so, I processed it 6 times before I was happy with the consistency.
To get the swirl pattern, when the yogurt is half frozen, add the reserved strawberry sauce to it in three additions and gently stir in with a skewer after each addition to create a marbled effect - doesn't it look absolutely wonderful?

Let it set and without any further ado, serve as soon as it sets.

Let it set and without any further ado, serve as soon as it sets.
Notes:
This frozen yogurt is best eaten as soon as it sets. If not, then take it out of the freezer and let it soften for about 5 mins before serving.
And much as I hate to say this, full fat yogurt and cream with give better results and faster!
This is my entry for My Favourite Things - Frozen Desserts that I am guest hosting, a lovely event conceived by Bindiya.
Have you made you favourite FROZEN DESSERT yet? Yes? Send it over soon :)
Monday, January 26, 2009
Kesar Pista Kulfi - Decadent Cool Fix
Well, I'll admit it. I'll admit that I lay in wait, armed with this recipe, for a suitable group of guests to make it for. Normally, I ALWAYS try any recipe for ourselves before I subject my guests to it. But with this one, I couldn't risk so many calories going straight only to my gluteus maximus, could I?!! So, guests = guinea pigs? Something like that!
What's this, they asked (it was mixed nationality group of guests we had) when we served the dessert.
Kulfi, we said.
Cool fay? Cool fix?
No, Kulfi. Coolfee. Indian ice cream, we said, by way of explanation.
Though, technically, kulfi is not ice cream. It is a distinct category of its own alongside sorbets, granitas, gelatos, frozen yoghurts etc.
Kulfi is believed to owe its origins to the Mughals. Blocks of ice would be brought in to Delhi from the Hindukush mountains in order to keep the royalty cool in the searing hot Delhi summers. Mughal chefs, having ice at their disposal and taking a cue from their Persian and Arabic counterparts (incidentally, ice cream traces its origins back to Persia where the royalty was served a special chilled pudding like dish with vermicelli and rosewater), later invented 'kulfi'.
From being once reserved exclusively for royalty, kulfi is now a street food in India sold by hawkers called kulfiwallahs. They sell the kulfi either in small earthern pots called matkas or in aluminium popsicle like molds. The molds are buried in a huge metal container holding a mixture of ice and salt - this effectively freezes the kulfi. Bearing a huge cane basket, in which they secure the metal container in a distinct red cloth, on top of their heads, you'll find them going from street to street enticing the taste buds with their loud cries of "kulfeeeee" on balmy summer nights!
Normally, kulfi is made by sweating over a the gas to painstakingly reduce the milk to almost half. However, I do not have the energy or the patience to do that. The memory of trying to make malai pedhas is fresh in my mind - reduce the milk, said the recipe till it becomes a solid mass. Yeah, right....I got all of 7 pedhas after over an hour of toiling and sweating!! Which is why I knew I had struck gold with this recipe. No boiling. No cooking. Just mix and freeze.
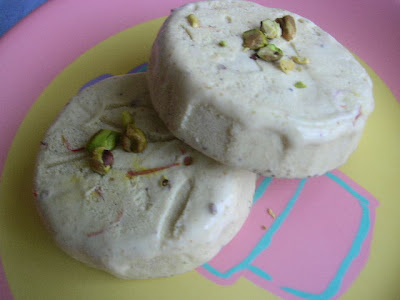
Ingredients:
for the base
1 can evaporated milk
1 can condensed milk
300 ml cream
breadcrumbs from 1 slice of bread
Traditionally, kulfi has been flavoured with cardamom, saffron and nuts, though today, a myriad of flavours abound, most popular being mango, custard apple, chikoo...and yes, even chocolate! I decided to stick to the traditional flavour of cardamom, pistachio and saffron.
for the flavouring:
10-12 pods of cardamom, peeled
1/2 cup pistachio, shelled
saffron, about 10-12 strands
rosewater - 1 tsp
Method:
Soak the saffron in the rosewater for about 10 mins. Grind the pistachio and the cardamom to a fine powder. Mix with the remaining ingredients for the kulfi base and process in a mixie. Now, stir in the soaked saffron. Pour into molds of your choice and freeze.
I set my kulfi in a 10" cake pan. To facilitate unmolding, just dab some butter in the centre of the pan and line with butter paper. Pour the kulfi mixture and freeze it. Before serving, run a knife dipped in hot water along the edge of the pan. Tip over your serving plate, rub the base vigorously with a kitchen towel, remove pan and peel off the butter paper. Cut and serve.
Makes enough to serve between 8-12 people, depending on the size of the slices.
Yes, it is high in calories. But, one bite and your guests will ask you for more, calories be damned. One bite, and you'll want to keep the whole thing for yourself, calories and guests be damned!!
What's this, they asked (it was mixed nationality group of guests we had) when we served the dessert.
Kulfi, we said.
Cool fay? Cool fix?
No, Kulfi. Coolfee. Indian ice cream, we said, by way of explanation.
Though, technically, kulfi is not ice cream. It is a distinct category of its own alongside sorbets, granitas, gelatos, frozen yoghurts etc.
Kulfi is believed to owe its origins to the Mughals. Blocks of ice would be brought in to Delhi from the Hindukush mountains in order to keep the royalty cool in the searing hot Delhi summers. Mughal chefs, having ice at their disposal and taking a cue from their Persian and Arabic counterparts (incidentally, ice cream traces its origins back to Persia where the royalty was served a special chilled pudding like dish with vermicelli and rosewater), later invented 'kulfi'.
From being once reserved exclusively for royalty, kulfi is now a street food in India sold by hawkers called kulfiwallahs. They sell the kulfi either in small earthern pots called matkas or in aluminium popsicle like molds. The molds are buried in a huge metal container holding a mixture of ice and salt - this effectively freezes the kulfi. Bearing a huge cane basket, in which they secure the metal container in a distinct red cloth, on top of their heads, you'll find them going from street to street enticing the taste buds with their loud cries of "kulfeeeee" on balmy summer nights!
Normally, kulfi is made by sweating over a the gas to painstakingly reduce the milk to almost half. However, I do not have the energy or the patience to do that. The memory of trying to make malai pedhas is fresh in my mind - reduce the milk, said the recipe till it becomes a solid mass. Yeah, right....I got all of 7 pedhas after over an hour of toiling and sweating!! Which is why I knew I had struck gold with this recipe. No boiling. No cooking. Just mix and freeze.

Ingredients:
for the base
1 can evaporated milk
1 can condensed milk
300 ml cream
breadcrumbs from 1 slice of bread
Traditionally, kulfi has been flavoured with cardamom, saffron and nuts, though today, a myriad of flavours abound, most popular being mango, custard apple, chikoo...and yes, even chocolate! I decided to stick to the traditional flavour of cardamom, pistachio and saffron.
for the flavouring:
10-12 pods of cardamom, peeled
1/2 cup pistachio, shelled
saffron, about 10-12 strands
rosewater - 1 tsp
Method:
Soak the saffron in the rosewater for about 10 mins. Grind the pistachio and the cardamom to a fine powder. Mix with the remaining ingredients for the kulfi base and process in a mixie. Now, stir in the soaked saffron. Pour into molds of your choice and freeze.
I set my kulfi in a 10" cake pan. To facilitate unmolding, just dab some butter in the centre of the pan and line with butter paper. Pour the kulfi mixture and freeze it. Before serving, run a knife dipped in hot water along the edge of the pan. Tip over your serving plate, rub the base vigorously with a kitchen towel, remove pan and peel off the butter paper. Cut and serve.
Makes enough to serve between 8-12 people, depending on the size of the slices.
Yes, it is high in calories. But, one bite and your guests will ask you for more, calories be damned. One bite, and you'll want to keep the whole thing for yourself, calories and guests be damned!!
Subscribe to:
Posts (Atom)


