Thursday, August 23, 2012
French Yogurt Cake - where baking is child's play
One moment, you are nagging urging your toddler to get more independent, the next moment you are left wondering when exactly was that moment when he/she grew up so much...motherhood is a long journey speckled with such tales.
This is one such story. One that left me awe-struck and proud that my daughter, who refuses to fix herself a bowl of cereal, could independently bake a cake.
My daughter, like me, loves the process of baking. Her eyes fill with wonder as she sees the ingredients added in, one after another, to make a batter that then rises to make a cake or bread, the aroma enveloping the entire house. "Wow, look at that', she exclaims when she sees the final product pulled out of the oven. I bake a lot with her just so I can rejoice with her in her sense of wonder. She has been my most trusted little helper in the kitchen, mixing in the ingredients as I measure them out.
One day, during her 2 month long vacation, she decided she wanted to bake a cake all by herself. She wanted to follow a recipe, she said, and bake a cake. Without any help from me. I was skeptical, she was determined.
We tried a couple of recipes, ones that didn't involve any creaming of butter and sugar, but she would get hassled at the use of multiple measuring cups... 1 1/3 cup of sugar, 2/3 cups of water, 2/3 cups + 2tbsps of oil...you get the picture. Clearly, we needed a recipe that made measuring the ingredients...well, child's play.
Looking up child friendly baking recipes on Google led me to the French Yogurt Cake. Apparently, the French Yogurt Cake is one that French kids learn to bake at a very young age because it is so easy to make.
Type French Yogurt Cake into your search engine and you will be flooded with recipes. I wanted one with a yogurt pot measure and ended up using this recipe as a guideline.

FRENCH YOGURT CAKE
Ingredients:
A bored toddler
A mom willing to clean up after the toddler is done messing up the kitchen baking
Full fat yogurt*: 1 pot (mine was 100gms)
Sugar: 2 pots, around 205 gms
All purpose flour: 3 pots, 220 gms
Eggs: 2 nos, or 100 gms
Oil: 3/4 pot
Baking powder: 1 1/2 tsp
Vanilla essence: 1 tsp
Salt: 1/4 tsp
Zest of a lime, optional
*You can use a yogurt pot of any volume...100 gms, 125 gms, 150 gms. Given the 1:2:3 ratio of yogurt, sugar, and flour, the quantity of sugar and flour will proportionately increase. Ensure that the weight of the eggs is equal to that of the yogurt. Also, you will need to increase the baking powder; for this cake, you will need to use 3/4 tsp per 50 gm egg.
Method:
Sieve together the flour, salt and baking powder 3 times.
Lightly beat the eggs with a fork. Add the sugar to the eggs and mix it in. To this, add the yogurt and the vanilla essence.
Next, pour the oil in a thin stream.
Finally, fold in the flour in 3 quick additions. Add the lime zest, if using.
Grease and line a 8" cake pan or a loaf pan and bake at 180 deg C or 350 deg F for about 30-35 mins, or until a skewer inserted in the centre of the cake comes out clean.
(I draw the line at measuring the ingredients, making the batter and pouring it into the pan. When it is time to handle the oven, I make sure that I am around).

This is delightfully soft cake and is perfect with a cup of tea or coffee. I savour every bite, not because it is a nice cake, but because of the little hands that make it! Try making this with your toddler and revel in their sense of accomplishment. Worth every single crumb, I promise.
This is one such story. One that left me awe-struck and proud that my daughter, who refuses to fix herself a bowl of cereal, could independently bake a cake.
My daughter, like me, loves the process of baking. Her eyes fill with wonder as she sees the ingredients added in, one after another, to make a batter that then rises to make a cake or bread, the aroma enveloping the entire house. "Wow, look at that', she exclaims when she sees the final product pulled out of the oven. I bake a lot with her just so I can rejoice with her in her sense of wonder. She has been my most trusted little helper in the kitchen, mixing in the ingredients as I measure them out.
One day, during her 2 month long vacation, she decided she wanted to bake a cake all by herself. She wanted to follow a recipe, she said, and bake a cake. Without any help from me. I was skeptical, she was determined.
We tried a couple of recipes, ones that didn't involve any creaming of butter and sugar, but she would get hassled at the use of multiple measuring cups... 1 1/3 cup of sugar, 2/3 cups of water, 2/3 cups + 2tbsps of oil...you get the picture. Clearly, we needed a recipe that made measuring the ingredients...well, child's play.
Looking up child friendly baking recipes on Google led me to the French Yogurt Cake. Apparently, the French Yogurt Cake is one that French kids learn to bake at a very young age because it is so easy to make.
Type French Yogurt Cake into your search engine and you will be flooded with recipes. I wanted one with a yogurt pot measure and ended up using this recipe as a guideline.

FRENCH YOGURT CAKE
Ingredients:
A bored toddler
A mom willing to clean up after the toddler is done
Full fat yogurt*: 1 pot (mine was 100gms)
Sugar: 2 pots, around 205 gms
All purpose flour: 3 pots, 220 gms
Eggs: 2 nos, or 100 gms
Oil: 3/4 pot
Baking powder: 1 1/2 tsp
Vanilla essence: 1 tsp
Salt: 1/4 tsp
Zest of a lime, optional
*You can use a yogurt pot of any volume...100 gms, 125 gms, 150 gms. Given the 1:2:3 ratio of yogurt, sugar, and flour, the quantity of sugar and flour will proportionately increase. Ensure that the weight of the eggs is equal to that of the yogurt. Also, you will need to increase the baking powder; for this cake, you will need to use 3/4 tsp per 50 gm egg.
Method:
Sieve together the flour, salt and baking powder 3 times.
Lightly beat the eggs with a fork. Add the sugar to the eggs and mix it in. To this, add the yogurt and the vanilla essence.
Next, pour the oil in a thin stream.
Finally, fold in the flour in 3 quick additions. Add the lime zest, if using.
Grease and line a 8" cake pan or a loaf pan and bake at 180 deg C or 350 deg F for about 30-35 mins, or until a skewer inserted in the centre of the cake comes out clean.
(I draw the line at measuring the ingredients, making the batter and pouring it into the pan. When it is time to handle the oven, I make sure that I am around).

This is delightfully soft cake and is perfect with a cup of tea or coffee. I savour every bite, not because it is a nice cake, but because of the little hands that make it! Try making this with your toddler and revel in their sense of accomplishment. Worth every single crumb, I promise.
Monday, August 13, 2012
Tres Leches Cake
I am, by nature, a procrastinator. My parents had nicknamed me 'the Queen of all things last minute'. It is not hard to see why. When in school, the homework would be done early in the morning between large gulps of milk, in college, projects would be finished by burning the proverbial midnight oil. Even today, I tend to fill out forms minutes before they need to be actually submitted. If you need any further proof of just how I tend to procrastinate, check out my entries to various food blog events...most of them are after the submission date.
When it comes to making desserts, however, I am the exact opposite. I will usually start making desserts soon after I have read the recipes - before I have even ascertained that I have all the ingredients that a recipe calls for.
So, why it took me almost 5 years to make the Tres Leches Cake is beyond me.
I first heard of, or rather read about, the Tres Leches Cake when I was looking up recipes for the Dulce de Leche flan. 'Pastel de Tres Leches' appeared as a related recipe on one of the many sites I visited.
I was intrigued by the Tres Leches Cake. The entire concept of mixing together and pouring a combination of 3 types of milk, and hence the name which translated means 3 milks cake, (condensed milk, evaporated milk and fresh cream) over a sponge cake fascinated me. Ever since I read about the cake, I made it many times....in my head. Sometimes, I would top the cake with mangoes. Other times, it would be peaches or lychees.
But I always stopped short of actually making the cake. I think it was fear that the milk mixture, devoid of any flavouring, would make the cake taste and smell very milky.
A couple of weeks ago, I came across a recipe that recommended using buttermilk. I loved the idea of using buttermilk, the tang from the buttermilk would be perfect to counter the 'milkiness' of condensed milk and evaporated milk.
I wasted no more time in making the Tres Leches Cake.

Tres Leches Cake
for the cake (recipe from the Pioneer Woman)
Eggs: 5, separated (mine weighed 51 gms)
Sugar: 1 cup
Milk: 1/3 cup
Vanilla essence: 1 1/2 tsp
All purpose flour: 1 cup
Cornflour: 1 tbsp
Baking powder : 1 1/2 tsp
Salt: 1/4 tsp
Oil: 1 tbsp
Method:
Sift together the flour, cornflour, baking powder and salt.
Whip the egg whites till you get soft peaks. Add 1/4 cup of sugar and whip till you get stiff peaks and set aside.
Beat together the egg yolks and the remaining 3/4 cup sugar till pale and creamy; the mixture should fall in ribbons when the beaters are lifted from the mixture.
Add the milk and vanilla essence.
Next, fold in the flour with a spatula till just combined.
Fold in the egg whites in 3 batches, and then add the oil and mix.
Pre-heat the oven to 350 deg F or 180 deg C. Grease and line a 10" round cake pan (I used a 9" cake pan, but on hindsight, I feel a 10" cake pan will be better; the original recipe uses a 9" x 13" pan).
Bake for 30-35 mins, or until a skewer inserted comes out clean. Cool the cake and then poke it all over right down to the bottom of the cake (at 1/2" intervals) with the skewer.
for the soaking liquid (adapted from Un Dejeuner de Soleil):
Evaporated milk: 1 1/2 cup
Condensed milk: 1 1/4 cup
Buttermilk: 3/4 cup
Brandy: 1 1/2 tbsps, optional
Vanilla pod: 1 small, or vanilla essence: 1 tsp
Method:
Slit the vanilla pod length-wise and scrape the seeds. Add the pod and the seeds to the evaporated milk and heat it till bubbles start to form around the edges of the evaporated milk. Cool and then add the condensed milk, buttermilk and brandy, if using.
Return the cake to the cake pan - I used a 9 1/2" springform pan, which made it easy for me to later transfer the cake on the cake platter - and slowly pour the milk over the cake starting at the edges and moving to the centre. I poured the milk in 3 batches, at an interval of 5 minutes between each addition.
Cover with clingfilm and refrigerate for at least 3-4 hours in order to allow the cake to absorb all the liquid.
for the topping:
Whipping cream: 300 ml
Icing sugar: to taste
Vanilla essence: 1/2 tsp
Frozen mixed berries: 450 gms
Sugar: 1/2 cup
Lemon juice: 1 tbsp
Cornflour: 2 tbsp mixed in a little water
Whip the cream with the icing sugar and essence till you get soft peaks.
Mix together the berries with the sugar and lemon juice and set aside for 30 minutes. Then, cook over a low heat till the berries soften and the juices start bubbling. Add the cornflour and stir continuously till the sauce thickens. Cool to room temperature.
Transfer the cake on a serving dish and spread the whipped cream over the top and sides of the cake and spoon the berry coulis over the top.

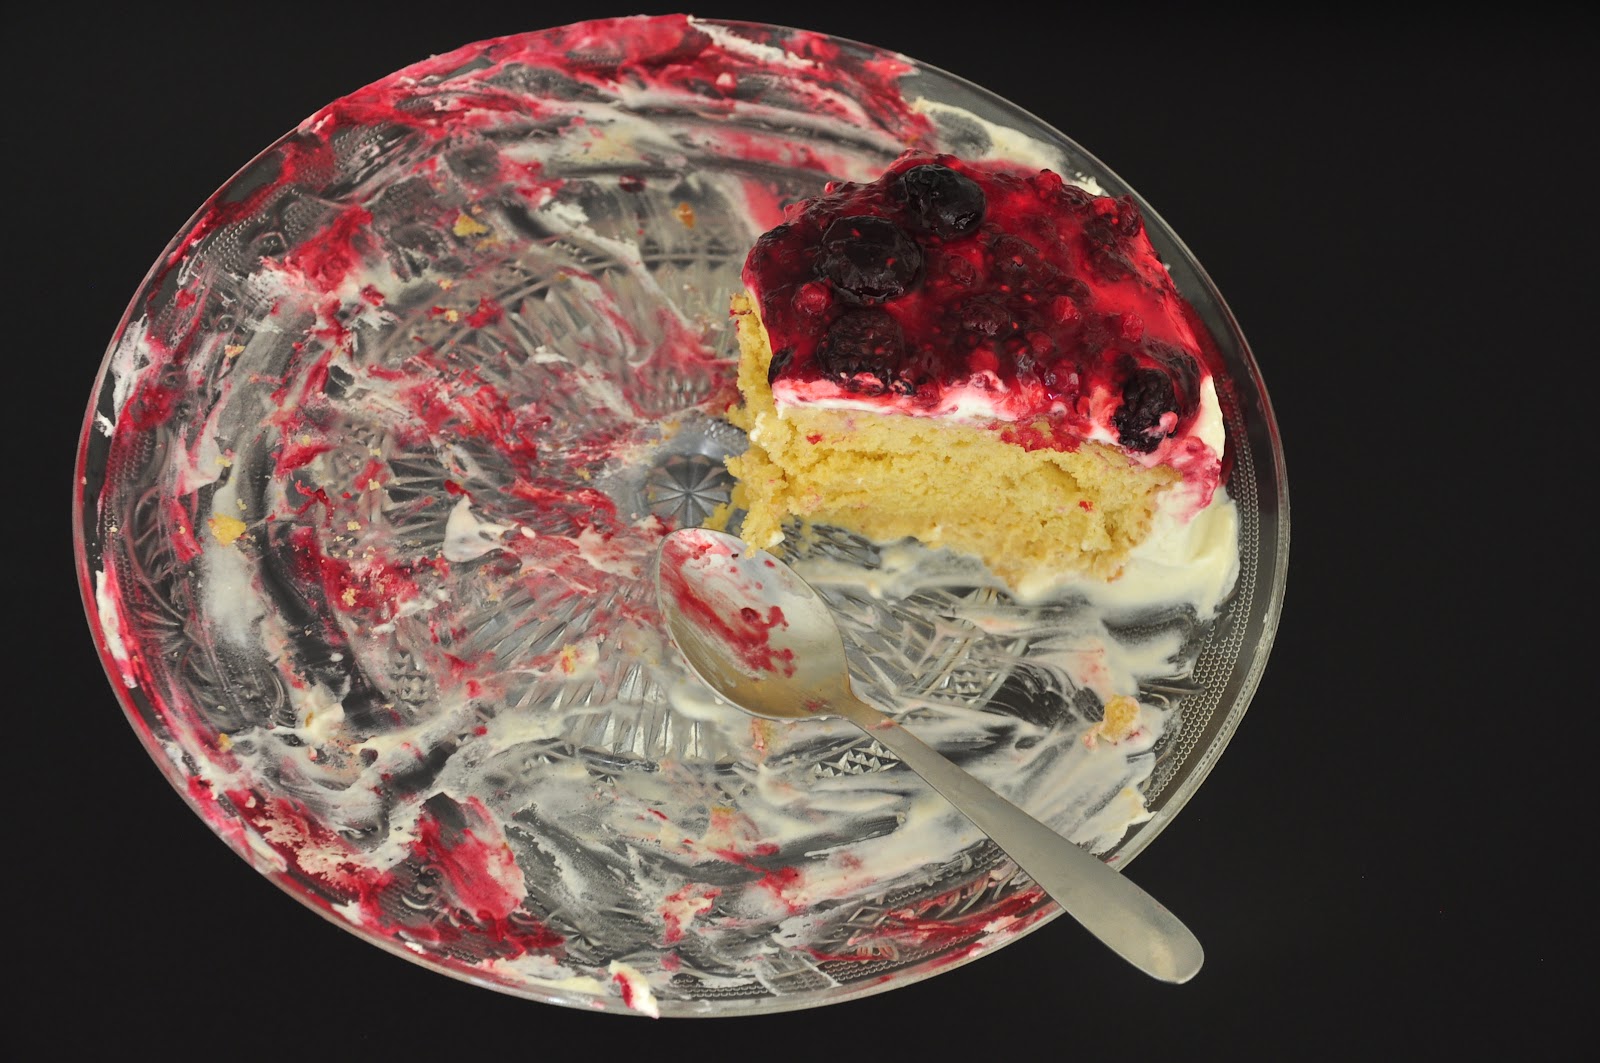
I made the Tres Leches Cake for a dinner party and it was devoured. Yes, devoured. There is no other word for it. This is all I was left with the next day; I barely manage to get a decent slice for a picture.
So, how is the cake, you ask.
To tell you the truth, in spite of all the praises heaped on the Tres Leches Cake, I made it with a bit of skepticism. I kept wondering if the soaking liquid would drown the cake and make it soggy, but I was wrong. It is amazing how the soaking liquid does not drench the cake. The cake stays firm, each slice retains its shape and yet each bite is very moist. The buttermilk gives it a slight tang, almost indiscernible, but still very much there. And then there is the whipped cream with the berry coulis...an explosion of flavours and texture in every bite.
I loved it so much that I can't wait to bake it again.
Oh, and in case if you are wondering what to do with the leftover evaporated milk, cream and condensed milk, make this kulfi which needs exactly the same ingredients.
Clearly, on some days, you can end up with a lot of dessert!
Tuesday, August 7, 2012
Glühwein
Most days begin like all other days. They slide through the same motions. Most of the times, they end the same way as any other day.
Routine. That is the word used to describe such days.
But sometimes, just sometimes, a day that begins like most others has something special in store, a magic that slowly unfolds as the minutes tick.
Today was one such special, magical day.
Today, it snowed in Johannesburg.

It was something really special, because snowfall in Joburg is rare. To put it in perspective, it has snowed all of 22 days in the last 103 years!

But what made the day absolutely magical was the fact that I was seeing snowfall for the first time in my life! The daughter and I frolicked outside, sticking our tongues out to taste the snow and dancing till our noses turned cold and numb.

To keep warm, I made some hot chocolate for her and Glühwein for me. Ok, not all of it for me, I was nice and shared it with some friends who dropped in.
I wanted to use Manisha's recipe but unfortunately, I was unable to access her blog today. So, I turned to Google (who else!) and adapted this recipe and another one that my friend Jess had emailed to make my Glühwein.

Ingredients:
Red wine: 1 litre (any red wine will do, I used a Merlot)*
Zest of 3 oranges and 1 lemon
Orange juice: 350 ml
Cinnamon quill: 2 nos
Cloves: 8
Star Anise: 1
Peppercorn: 10 nos
Sugar: 1/2 cup
Brandy: 1/2 cup, or less.
*Most recipes will recommend using a cheaper wine, but according to Jess, the cheaper the wine, the more sugar you need. Don't pull out your best wine, but the wine should be drinkable.
Method:
Combine all the ingredients in a saucepan, except the brandy, and heat gently for about 20 minutes without allowing the mixture come to a boil.
Turn off the heat, cover and allow all the flavours to infuse, about 30 minutes.
Strain, re-heat, add the brandy and serve.

Just as the Glühwein was ready to sip, it began snowing in earnest. Obviously, I had to first freeze my fingers and take some pictures.

Perfect day to enjoy the Glühwein. You do agree, don't you?
Subscribe to:
Posts (Atom)


